User Roles and Permissions
There are three main roles of users on the Overcast platform. You can set access and permission levels for each user to implement your governance policy for your data and assets.
While planning permissions for your team and external agencies, consider the workflow relevant to them, which user needs access to which assets and what role or actions each user needs to perform.
The three main roles that you can assign to your users are:
- Team Member
- Admin
- Collaborators
When you define users on the Overcast platform, you can assign the above roles to them as per business requirements and use cases.
User Roles Description
1) Team Members
Team member permissions are granted to individuals who require access to manage, share, and collaborate on content. Team members usually have a company email address that matches the account and has more functionality and permissions than Collaborators. They can access all your assets and can modify them.
Permissions:
- Full access to assets (unless protected)
- Able to see all projects (unless the admin, or project owner has removed access)
- Able to comment on all files
- Full access to menu functionality
- Access to Dashboard – can see the assets summary, analytics and activity log
- Access to the Overcast Learn section (tutorials and guidelines)
2) Admin
Admins are top-level users who can do everything a Team Member can, but who have extra system-wide powers.
Permissions:
- All the permissions that team members have
- See all projects
- Add and remove Team Members and collaborators
- Change account details
- Change user permissions
- Make content public
- Create live events
- View Activity Log Filters
- Create, implement and save watermark
3) Collaborators
Collaborators are usually clients, freelancers or members of the team who need to have very limited functionality.
Permissions:
- Attached to one project at a time
- Able to see all projects (unless admin, or project owner has removed access)
- Able to comment on all files
- Limited menu functionality
- Access the Overcast “learn” section
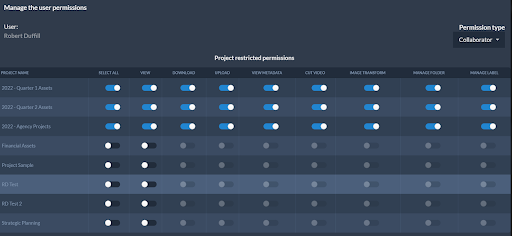
Permissions can be restricted individually on:
a) View
b) Download
c) Upload
d) View metadata
e) Image transformation
f) Cut video
g) Manage folders
h) Manage labels
Collaborators can be given access project wise

Managing User Roles
- Navigate to the Users Page by clicking the hamburger button in the top left-hand corner and then clicking the Users button. A list of users appears.
- Click the blue View button on the right hand side of the screen beside a particular user’s profile. That user’s profile appears.
- Click Edit.
- Under User Permissions on the right hand side of the screen, click Manage Permissions.
- Choose Permission Type.
- Click Change Permissions button.
Note: if you downgrade a user’s permissions to collaborator status, you will be asked to choose which projects the user will have access to.
Changing permissions on a Project by Project basis
- Click on the Side Bar Menu.
- Click on Projects.
- Choose the project you want to and click View Project.
- Click Edit.
- Click Manage Permissions.
- Click Lock This Project.
- Toggle on and off who has permission to view the project.
- Click Change Permissions button.
Note: All Admins can see all projects. And any Team Member that creates a project will always be able to view their own projects.
Adding new Team Members and Admins
- Navigate to the Users page by clicking the hamburger button in the top left-hand corner and then clicking the Users button.
- Click on Invite New User button.
- A pop-up window will appear for you. Invite the new user by typing in their email address.
- From the drop-down menu entitled Permission Type, select either Team Member or Account Admin.
- Then click the green Invite New User button.
- A pre-populated email will be sent to the new user with a direct link asking the user to authenticate themselves on the account.
Note: You cannot invite Collaborators from here – they must be invited from the Projects sections.
Adding new Collaborators
Note: Before a collaborator can be added to a project, the project must exist.
- When your project is created, navigate to the Projects Page via the hamburger menu.
- This projects page displays a list of your projects – click the blue Invite Collaborator button beside the relevant project to add a new collaborator.
- A pop-up window will appear for you. Invite the collaborator to the project by typing their email address.
- Choose the collaborator’s permissions by sliding the Download and Upload buttons to the right if you’d like the new collaborator to have those permissions.
- Click Invite Collaborator.
- A pre-populated email will be sent to the new user with a direct link asking the user to authenticate themselves on the account for the specific project.